Configuring Windows Live Writer to Post to Drupal, Blogs and Custom Content Type
Screencast Summary
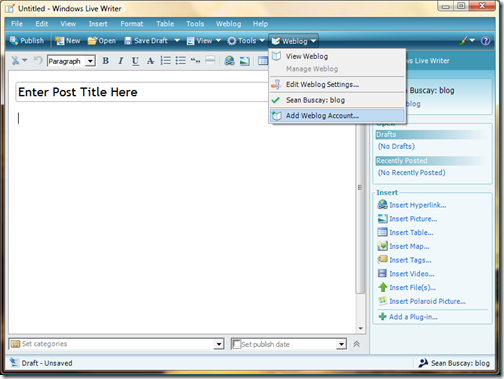
Add Weblog Account
Let’s begin by adding a new Weblog account from within Windows Live Writer.
From the Weblog button or Weblog menu, choose “add Weblog account”.
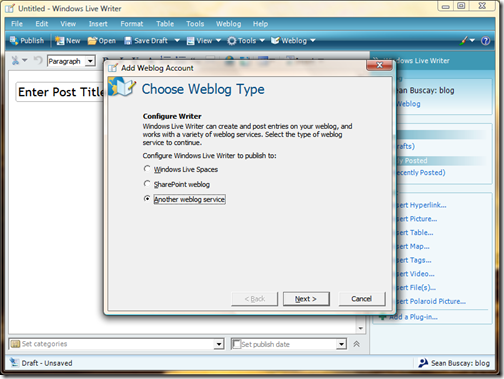
Choose Weblog Type
Next, select the option labeled, “Another Weblog service”.
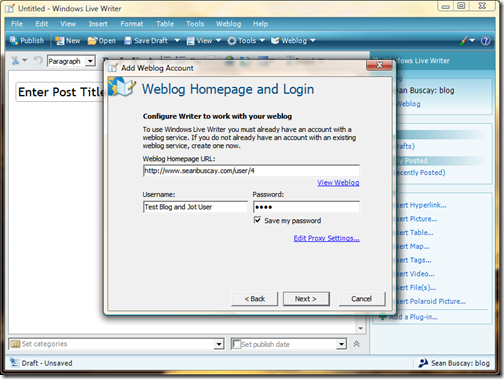
Weblog Homepage and Login
In the “Add Weblog Account” dialogue box, enter the user”s Weblog Homepage URL, Username, and Password. For the Weblog Homepage URL, enter the user”s Drupal account URL. For example, http://yourblogurl.com/user/<userid> (replace <userid> with the user”s id number).
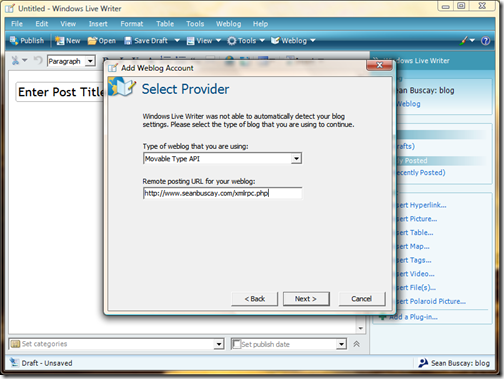
Select Provider (Blog API)
Next, Windows Live Writer will try to detect your Weblog settings.
Most likely Windows Live Writer will not automatically detect your Drupal blog settings. Live Writer will then ask you to select a provider, which is simply what Blog API you would like to use. I”ve tested several Blog APIs with Drupal. The Movable Type API seems to work well for my client”s needs. We”ll select this option from the drop down menu.
Now, you will be asked to enter the “Remote posting URL for your Weblog”. This is the URL to your Drupal installation’s XML-RPC file. It is usually located in Drupal”s main install directory at: http://yourblogurl.com/xmlrpc.php.
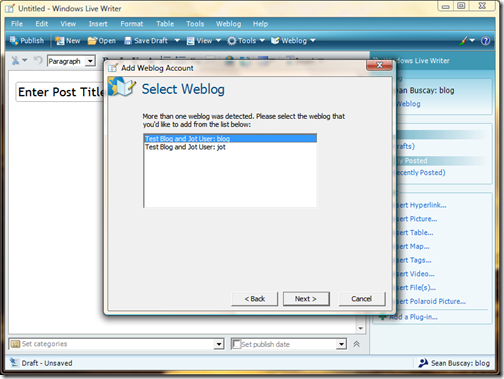
Select Weblog
Note: Windows Live Writer has detected more than one Weblog. The user I am adding has been assigned two roles. One role gives permission to manage a blog. The second role gives permission to post a custom content type called, “jots”. Drupal’s Blog API module has been set to allow both content types to be managed remotely. Thus Windows Live Writer has let us know it detected more than one Weblog and asks us to select a Weblog (content type) from the list. Note that both the blog content type and the jot content type are each called a “Weblog” by Windows Live Writer.
If the user had permission to post to only one content type, then just the one content type would be automatically selected by Live Writer.
We”ll select the blog content type.
Detecting Blog Theme
Next, Live Writer may ask to detect your blog’s theme (style sheets). This would allow you to see what your blog post will look like on-line while you write it in Live Writer. If you click yes and it fails, everything will still function correctly. Even if it does not fail, the display in the editor will most likely NOT look exactly like your post will look on-line.
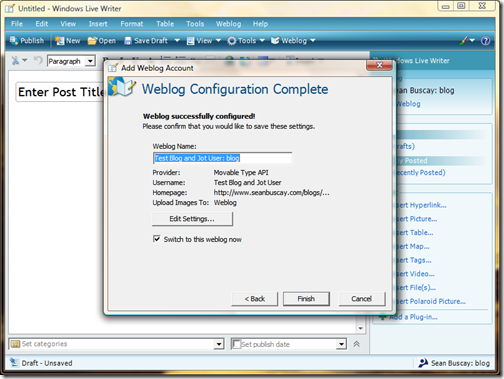
Weblog Configuration Complete
Upon completion, you should see the message, “Weblog Configuration Complete”. Congratulations, you have successfully configured Windows Live Writer to post to a Drupal powered blog.
Creating a Weblog for a Custom Content Type
Now, let”s create a second Weblog account for the same user to post to our custom “jot” content type.
A second content type appears as a second Weblog account to the end-user.
We”ll repeat the previous process, using the same information as before, since we are adding the same user.
Note: Still using the URL for user 4. Same remote posting URL: http://yourblogurl.com/xmlrpc.php
Again, Live Writer detects more than one Weblog, because our user has permission to post to both, and both were made available in Drupal”s Blog API settings. This time, we add the “jot” content type, so we select the Weblog titled, “Test Blog and Jot User: jot”. The format is, Drupal Username: Drupal Content type.
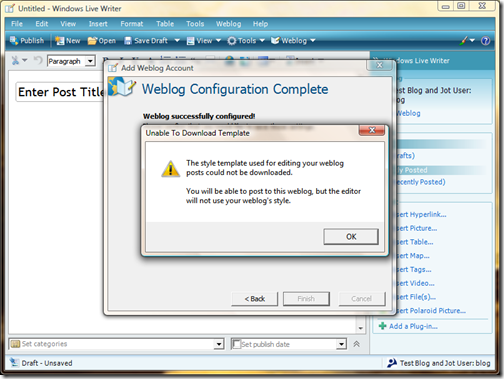
Notice this time, Live Writer failed to detect the theme settings. This happens usually when a second Weblog account is added for the same user, or when posting to a second content type other than the blog type. If you really want Windows Live Writer”s to display your blog theme in the editor, there is a registry edit you can do in Live Writer to fix this issue. See http://drupal.org/node/221677#comment-755721 . I don”t rely on Windows Live Writer”s display of my theme.
Congratulations
Upon completion, you should see the message, “Weblog Configuration Complete”. Again, Congratulations! We have seen how to successfully configure Windows Live Writer to post to a Drupal powered website with a custom content type.
Share or Comment via Twitter